Select Page
Benefits of Buttermilk spray on insecticides and pesticides

Benefits of Buttermilk spray on insecticides and pesticides

Benefits of Buttermilk spray on insecticides and pesticides– Buttermilk spray is a very good mixture for fighting the danger of sucking pests and insects.

This mixture can be easily prepared at home by farmers.

Essential ingredients for buttermilk spray:

• clay pot

• Buttermilk spray 5 liters

• Small piece of copper

• Polyethylene


Preparation method of buttermilk spray:-

Step 1:

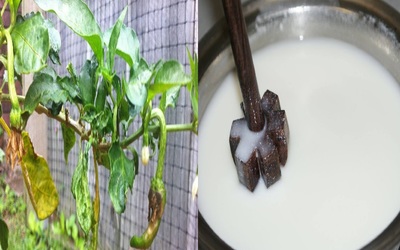
Take a plastic or clay pot and put 5 liters of buttermilk and a small piece of copper metal. A small piece of copper metal acts like fungicide and rotting buttermilk.

Step 2:

cover the opening of clay pot with polythene. Clay pot should be kept in the shade and also should not be in contact with rain water. Leave the mixture to fermentation for 15 days.
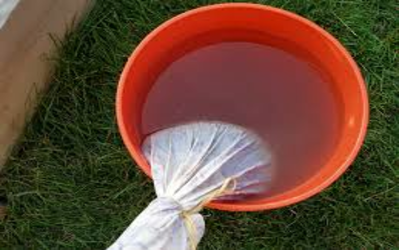
Step 3:

Filter the mixture of rotten buttermilk after 15 days.
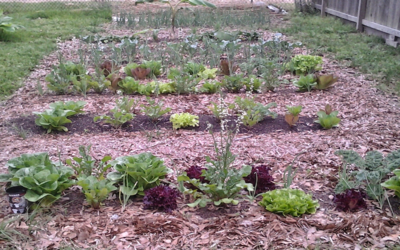
Step 4:

After 15 days use this mixture on the crops and vegetables.

Preparation time:

15 days

Use:

Mix 250 ml-500 ml mixture in 15 liters of water and spray it continuously on crops and vegetables for 4-5 days with the help of foiler-spray.

Pay attention:

1. Clay pot should not be cracked.

Poonam Singh

Bio-fungicides

Bio-fungicides

Bio-fungicides are the formulations of living organisms that are used to control the activity of plant pathogenic fungi and bacteria. The concept of bio-fungicides is based on observations of natural processes, where beneficial microorganisms, usually isolated from soil, hinder the activity of plant pathogens. Bio-fungicides are made up of a beneficial fungus and bacteria, which attack pathogenic plants and colonize, causing them to thwart diseases. These microorganisms are usually and naturally found in soil, making them an environmentally friendly alternative to chemical fungicides. Additionally, using bio-fungicides in gardens as an incorporated disease management program reduces the risk of pathogens becoming resistant to chemical fungicides.

How do Bio-fungicides work-

Bio-fungicides control other microorganism in the four following ways:-

1. Through direct competition, bio-fungicides grow a defensive barrier around the root system, or rhizosphere, thereby shielding the roots from harmful attacking fungi.

2. Bio-fungicides also produce a chemical similar to an antibiotic, which is toxic to the invading pathogen. This process is called antibiosis.

3. Bio-fungicides attack and feed harmful pathogens.

4. Bio-fungicides has to be in the rhizosphere either before or at the same time as the pathogen.

5. Predation by the bio-fungicides will not affect the harmful pathogen. If it presents after it has infecting the roots.

6. Bio-fungicides soon start the plant’s immune defense mechanisms enabling it to successfully fight off the invading harmful pathogen.

Uses-

It is important to Know when to use a bio-fungicides. As mentioned above, introduction of fungicides will not “cure” an already infected plant. When using bio-fungicides in the garden, it should be applied before the onset of disease development. Early applications protects the roots against attacking fungai and vigorous development of root hairs. Bio-fungicides should always be used in conjunction with basic cultural control of hygiene, which is the first line of defense for protection from disease.

Poonam Singh

Decomposer

Decomposer

A decomposer is an organism that decomposes or breaks down organic material such as the remains of dead organisms. Decomposers are involved in bacteria and fungi. Which all live organisms pass after death. These organisms complete the process of decomposition. Decomposition is an important process, it allows organic matter to be renewed in the ecosystem.

Fungi:

Raw organic matter is the primary decompose, which are unicellular saprotrophic fungi, which grow as a branching network of hyphae. The fungi can use their hyphae to penetrate a large piece of organic matter. Fungi break down enzymes into decaying materials by decomposing organic matter, after which they absorb the decaying material nutrients.

Bacteria:

1. Bacteria are important decomposers. They break down any types of organic matter.

2. A gram of soil typically contains 40 million bacterial cells, and these bacteria make biomass on earth.

3. Bacteria are important in the recycling of nutrient.

Function of Decomposers

1. Decomposers play an important role in every ecosystem.

2. The decomposers, dead organisms will neither be broken down and renewed into other living matter.

3. The reason for the decomposers decompose, however, is simply, because they need to survive.

4. Decomposers are heterotrophic, meaning that they derive their energy from organic materials.

5. A dead organism provides nutrients for decomposers such as bacteria and fungi.

6. They can use to order to grow and propagating, reproduce their own species.

7. This is the side effect of this basic need to survive that organic material and nutrients are cycled throughout the ecosystem as other organisms consume the bacteria and fungi.

Benefit:

1. The decomposer breaks down the remains of dead organisms, including animal waste, into products of simple substances re-used by plants.

2. Decomposer makes the process of composting faster

3. The decomposer excretes the rest as nutrient into soil and gases like: – nitrogen and carbon dioxide.

4. plays an important role in ecosystem.

Poonam Singh

Soil Conditioners

Soil Conditioners

Soil conditioners are substances produced from organic or non-organic matter. When the conditioner is incorporated into and mixed with your garden soil. So it improves the soil properties, and adds slow releasing  nutrients.

It is usually used for various types of horticulture projects. Weed seeds are naturally finished with this extracted material. Over time, the soil tends becomes compacted, which is bad for plants. Compacted soil can  negative effect on the root growth. Along with this, decrease the ability of plant’s to take up nutrients and water. Soil conditioners can add more loft and texture to keep the soil loose. Soil conditioner can come in many forms like cow manure, peat moss, EM1 and organic compost just to name a few. They can be applied in many ways to your garden. Some conditioners are applied after planting while others may be  worked and  put into the soil before the planting begins.

Generally it is added to improve soil properties and for fertility. Soil conditioners are involved in both natural and synthetic varieties. In addition, individual materials can be used as soil conditioners, because of their ability to improves the quality of soil.

The soil conditioner can be applied to soil using several different method and in varying numbers of applications.

Benefits of Soil Conditioner-

1. Adding the soil conditioner to your garden helps improves moisture retention.

2. It makes water easily accessible for the roots of all your plants.

3. cores soil does not retain water well.

4. The conditioner helps in binding together soil particles into porous granules.

5. It allows air and water to move through the soil.

6. Organic matter in soil conditioner retains moisture.

7. It is able to absorb and store nutrients more easily.

8. Soil conditioners increase the nutrient retention by collecting the nutrients scaping away from the roots, especially in soils that are sandy.

9. The organic matter is food for micro-organisms and other forms of life found in soil.

Poonam Singh

Biostimulant- Improvement of seed and increase in crop yields

Biostimulant- Improvement of seed and increase in crop yields

Biostimulant are made up of various types of biological materials, microorganisms and compounds that can be applied directly to plants,  Those who can improve the plants  seeds or soil to improve a plant’s vigor, increase crop yield and relieve stress of plants. The use of biostimulants can start in the seed germination phase and continue throughout the plant’s entire life cycle.

Biostimulants work to increase the plant’s ability to absorbing nutrients so  it can develop properly. when applied to soil, biostimulants improve the  soil,s supplementary micro-organisms that help a plant,s  roots grow and form a beneficial Symbiotic relationship. Biostimulants can promote the development of roots and distribution of nutrients by promoting soil supplement microorganisms and improving metabolic efficiency:

  • Increase yield in terms of weight, seed and fruit set.
  • Enhance quantity, affecting sugar content, colour and shelf life.
  • Improve the efficiency of water usage.
  • strengthens stress tolerance and recovery.

Benefits of biostimultants: –

1. Biostimulants help in combating the effects of enviromental stresses

  • Biostimulants promote the growth of germination and root.
  • There is resistance to increasing strength and more stress.
  • An enhanced root system promotes more efficient nutrients, elevation and water uptake and translocation throughout the growing season.

2. Biostimulants encourage plant growth.

Promoting growth and improvement plant’s  metabolism can benefit in overall plant growth and health. Apart from this, providing a catalyst at  specific developmental phases can lead to increased yield, improved uniformity and quality of the overall crop.

3. Biostimulants encourage the growth of plants.

  • Biostimants usually work through different mechanisms compared to standard fertilizers.
  • Encouraging plant growth, provide essential nutrients for plant metabolism.
  • These metabolism pathways upregulate gene expression, which influence cell division and sizing, root, shoot growth, reproduction development and timing.


Calcium Fertilize

Calcium Fertilize

Foliar feeding with calcium fertilizer (the uses of calcium-rich fertilizer to the plant leaves) may makes the difference between a good crop of tomatoes to fruit with blossoming and rot, or gorgeous Granny Smith apples becomes bitter ones. Let’s learn more about making and using a calcium foliar spray for plants.

Why Use Homemade Calcium Rich Foliar Spray?

Calcium foliar spray gives essential calcium to the plants, preventing leaf necrosis, small brown roots, fungal issues, weak stems and stunted growth. Making calcium spray for plants will increase cell division, an important component, especially in those rapid growers such as: – Tomatoes, sweet potatoes, and maize increase. Although it is true that acidic soil have a decreases amount of calcium compared to more alkaline soils, pH is not a true reflection of the necessity for foliar feeding with calcium but may be used as a general guideline.

Homemade Calcium Rich Foliar Spray: –

While commercial calcium foliar spray may be purchased. This is less expensive, and  just as easy to make a homemade calcium rich foliar spray with ingredients already in the home or garden. If you are experiencing any symptoms above of the plant or have soil pH tested and  there is a lack of calcium, now is a good time to learn how to make your calcium fertilizer.

1. Egg Shell

Foliar feeding with Calcium Rich Eggshells plants require a proportion of calcium and magnesium for plants. When one goes up, the other goes down. Using your compost, which is usually rich in calcium or can be In modified with the  addition of lime or eggshells, which is a good way to increase the calcium levels in growing plants. Another way to accomplish this goal is to make calcium spraying for plants with egg shell.

Preparation method-

1. To make calcium spray for plants with egg shell, boil 20 eggs in a covered pan of 1 gallon of water.

2. Bring to a rolling boil, remove from heat.

3. Leave it for cool 24 hours.

4. Filter the water of shell fragment and collect it an airtight container and keep it cool and dark place.

2. Foliar feeding with calcium rich seaweed

Particularly rich in bromine and iodine, seaweed is also rich in nitrogen, iron, sodium and calcium.

how to make your own calcium fertilizer out of seaweed?

1. Collect the seaweed (if legal to do so where you are) or buy at the garden store.

2. Wash this seaweed thoroughly.

3. Chop up the seaweed and cover with 2 gallons of water in bucket.

4. Leave it for a few weeks with fermented lid for fermentation, and then filter it.

5. Cover loosely, ferment for a few weeks, and then strain.

6. Dilute 2/3 cup to one gallon of water to make a calcium foliar spray.

3. How to make your own calcium fertilizer from Chamomile

Chamomile flower is the sources of calcium, potash and sulfur.

It is also good for dumping preventing off and many other fungal issues.

Preparation method:-

1. Pour 2 cups of boiling water over ¼ cup chamomile (or you can use chamomile tea).

2. Leave this mixture until cool.

3. strain and place in spray bottle.

4. We can store this mixture for a week.

5. Use this mixture for foliar spray on the plants.

Tobacco Dust fertilizer-used as pesticide

Tobacco Dust fertilizer-used as pesticide

Tobacco dust fertilizers contain high organic compounds, which improves the soil chemical structure by improving Ions structure, electrical conductivity and nutrient levels. Apart from this refining the water intake capacity, water retention capacity and improves the soil physically.

The tobacco dust fertilizers reduces the soil bulk density while its increases the organic carbon content (OC), soil holes and infiltration of the soil has stated that the carbon provision of the carbon (C) through the amendments such as tobacco dust leads to the facility of the energy sources to the microorganisms in the soil and make them energetic in the soil that cause of the aeration source /oxygen distribution into the soil.

Uses of Tobacco Dust Powder :-

1. In fertilizer

2. In lawn

3. In Pesticide

Necessary ingredients:-

1. Dry Tobacco Leaves (Cigarette Buds)

2. Mild liquid soap

3. Bowl or bucket

4. Strainer or cheesecloth

5. Container with lid

6. Spray Bottle

Preparation method:-

1. Put 1 cup of tobacco leaves (cigarette buds) in 1 gallon hot water.

2. Add 10 drops mixed light liquid soap. Soap helps homemade spray adhere to plants.

3. Steep the solution for at least 30 minutes.

4. Pour the solution through a mesh strainer or cheesecloth into a bucket or bin with a lid. Keep the mixture on hand for up to a month.

5. Put the mixture in some quantity in the spray bottle.

6. Spray the bottom part of leaves on affected plants. Cover the leaves thoroughly with the spray solution.

7. Spray the lower part of the plant’s stem and the surrounding soil. For large-scale plantings, pour the solution from the bucket onto the soil.

8. Refill spray bottle as needed for foliar applications, or pour the solution from the bucket onto areas with severe ground pest infestations.

Uses: –

Nicotine spray are a traditional treatment for many types of pests, including whiteflies, gants, root and leaf aphids, thrips and lefaminers. While commercial nicotine sprays are so powerful that they can kill many beneficial insects as plant predators, homemade “tobacco juice” is short-lived and much milder. Used sparingly, it may be an important member in your arsenal of natural pest control.

Benefit: –

Potassium and phosphorus, which can provide essential nutrients to the soil and plant. The local data of the Department of Agriculture (DA) also showed that when tobacco dust is mixed with organic compost, then its nitrogen content has a positive effect on vegetable and home-grown plants.

Warning

1. If using tobacco juices on edible plants, restrict your spray schedule to early growth, and apply it several weeks before expected harvest. Nicotine can stay in the plant’s system for many weeks.

2. Tomatoes, chilli and eggplants, which are in the same nightshade family as tobacco, are susceptible to tobacco mosaic disease. Check your nursery information to see if  your nursery  plants are bred to be resistant to the disease. If you are not sure, then skip the tobacco juice treatment for these plants.

Manure Tea-provide essential nutrients

Manure Tea-provide essential nutrients

Manure tea is similar to compost tea fertilizer. Decomposed animal  manure is mixed in water, and until the water has becomes dark brown color, it is allowed to remain immersed in it. The solid materials of manure are taken out, then the liquid is used to lawns, gardens and flowers. Human waste is not recommended, because it contains parasites and diseases that should not be present into your soil.

It is compost tea, but uses composted livestock manure. The manure is collected in the sun during many months and then the compost is made. The livestock are raised in pastures where grasslands are available, where cattle are allowed to graze according to nature intended. Manure teas are used as a soil conditioner in vegetable gardens, flower gardens, lawns  and compost piles. The soil condition is better by planting plants  with composting tea, so that the roots of plants can absorb nutrients. It also provides valuable nutrients, minerals and beneficial microorganisms that help in growing strong and healthy plants. To speed up decomposition, manure tea can also be added directly to compost pile.

Method of preparation: –

1.Fill a 5 gallons (18.9 litres) bucket with the appropriate amount of water.

2. Put the manure into a large burlap sack or pillowcase. You should use 5 parts of water to 1 part manure.

3. Tie a knot in the sack to secure it.

4. Put the sack into the water.

6. Cover the bucket with a towel to keep flies away.

7. Let the sack to steep in the water for several days. The tea manure should reach a deep, dark golden brown color.

8. Remove the sack from the water after its been full steeped and allow it to hang over the bucket until it no longer drips.

10. This dilute mixture with clean water.

11. Apply to your plants and see them grow beautiful and healthy.

Use: –

Manure  tea can be applied in a many ways. To spray easily, keep in a spray bottle, or in a watering can for better saturation. A hose-end sprayer can be utilized for large areas. Manure tea can be put directly onto a compost heap to speed decomposition.

Benefit: –

Manure tea provides nutrients and minerals quickly. Most chemical fertilizers are slow released, which can take days or weeks to take effect. Manure  tea fast to provide  your plants with essential nutrients when, and where, they require the most. Manure tea can be used as a foilar sprays misted onto plant leaves.

Leaf Mulch

Leaf Mulch

Leaf Mulch is a layer of shredded leaves, which are applied on the soil surface. Truth be said, mulch can be almost any material. To save and enrich the soil of your garden, just spread around the plants. They are another conventional method of maintaining soil moisture, and the coverage they  provide can suppress weeds.

Method of making leaf mulch: –

1. Making leaf mulches is very easy, and there are several ways to do so. First of all, you need to collect any fall autumn leaves.

2. When collecting leaves, you should avoid using any that are diseased, because you will only take risk of spreading the disease to your other plants if you use them as leaf much. You should also avoid using leaves that are mixed with garbage, as the litter will struggle to break down and add contamination to your soil and leaf mulch.

3. Once you have collected all the leaves you need, you need to piece them. Most of the best garden spaces will shred the leaves, as they are collected, making the whole process of making leaf mulch unusually quick. If you have collected leaves with your hands, then you can use a leaf or garden shredder. Another option is to place all the leaves in a plastic rubbish bin and using a grass trimmer a bit like a kitchen blender.

Uses: –

Once all your leaves have been cut to a suitable size, then lay the leaves in your flower beds. Approximately 2 to 3 inches thick. Make sure that  the mulch does not smoother the small plants and make sure that the mulch does not touch the stems of any plants. Try and stay a few inches away from  the stems. It  is the best practice to avoid plants directly touching any  decomposing material like leaf mulch.

1. Use 4 to 5 inches around trees and shrubs to help protect their bases.

2. From late autumn, use mulch to cure rose bushes. Remember to remove this spring when the growth cycle starts again.

3. Working mulch back into your garden’s coil will mean your means soil will start fill with earthworms and other beneficial organisms. Meaning a healthier garden.

4. Make sure to shred leaves as much as you can. The section of whole leaves can bind together and become matted, which meaning water cannot pass through the surface. By reducing their size, you reduce this risk and give micro-organisms more surface area to work with.

5. Leaf malt is carbon-rich (brown-material), use it in your compost pile to balance out nitrogen-rich (green-material) waste such as fresh grass clippings.

Benefit::-

Beside keeping the weed growth low, using mulch can help your yard in many ways, including the following:

1. Reduce water loss in the soil.

2. Controlling erosion.

3. Regulating soil temperature (keeping it cooler in summer, warmer in winter).

4. Improving the soil, once the mulch has broken down (in the case of the organic kinds of mulches, such as shredded leaves).

5. Drawing beneficial worms to the garden.

6. Keeping decorative fruits up off the bare ground, which helps preserve an unspoiled appearance

Poonam Singh

Cover Crop

Cover Crop

A Cover Crop is a specific plant crop, which is mainly grown for the benefit of soil rather than the crop yield. Cover crops are commonly used to help suppress weeds, manage soil erosion and improve soil fertility and quality, and control diseases and pests. Cover crops are usually grasses or legumes but may be include of other green plants.

Cover crops are plants grown outdoors for the purpose of increasing the quality of the  soil. They help make regulate water, increase biodiversity, and improve farming as a whole.  These types of crops are also used in landscaping to enhance the look of a property.

Cover crops stay low or less to  land, are cheap to plant, and they do not require much maintenance. The popular options for cover crops are wheat, clover, rye, mustard, peas, and sudangrass. Cover crops are mainly used in large farms or land in-ground  garden rather than raised beds.

Why grow cover crops: –

Cover crops are plants grown  to save or improve the soil for future crops. Covering the soil in winter protects it from erosion and helps support all the beneficial life associated with it. This gives weed less opportunity to establish, meaning cleaner bed for sowing or planting in spring. At the end of winter, dig the covered crop into the ground and it will rot down to add valuable organic material in the soil, which will helping to feed the plants  that follow.

Benefits of Cover Crop: –

1. Cover crops improve biodiversity by increasing the variety of species in a given area. They also can help in reduce the amount of water that drain off an area, and prevents waterways and downstream ecosystem from erosion. Because roots of the cover crop make holes in the soil, cover crops help allow water to filter deep into the ground. As a result, cover crops help conserve water in many ways.

2. Cover crops can help break disease cycles by reducing the amount of bacteria and fungal diseases in the soil. If you have a soil that is infected, then you can plant a cover crop in that area as a means of eradicate the disease.

3. Cover crops are sometimes called “green manure” because they provide nutrients to the soil, as it manure does. They are also called “living mulches” because they can prevent soil erosion. A mulch is a layer of organic material, such as crop residue, which is left on the surface of the soil to prevent the drainage of water and protect the soil from the harmful effects of heavy rainfall.

Poonam Singh

Follow by Email
LinkedIn
Share