Select Page
Grass Fertilizer-nutrients available in grass fertilizer

Grass Fertilizer-nutrients available in grass fertilizer

It is difficult to beat a piece of grass as fertilizer, which is usually low-cost, because they are usually free. Grass fertilizers are used to prevent weeds and to maintain the protection of moisture in the soil. However, nitrogen content is different in each batch. Along with this, in the growing season for plant growth, 1 to 2 inches tall of grass, only one layer is sufficient. Do not use such a weed grass which has been grown using herbicide.

Nutrients and fertilizers

It is very good to tell people that the piece of grass is a very good natural fertilizer. In which nitrogen, phosphorus, and potassium (N, P, K) are the least rich. These are the numbers and names you see on a bag of fertilizer in your local home and garden centre. 30-0-8 means that the amount of 30% nitrogen, 0% phosphorus, and 8% potassium is present. It not only keeps your garden healthy, but it also shows green with its use. Along with this, it also helps in the prevention of weed killers.

We see, that most weeds, such as: – Dondelions, Charlie creep and clovers are usually like an acidic soil, which grow with pH below 7.0. In addition, keeping the pieces of grass in the garden, especially the amount of phosphorus and nutrients is increased. Keeping the natural pH 7.0 of the garden helps keep these weeds present.

Grass fertilizers contain nitrogen, oxygen and phosphorus in rich form.

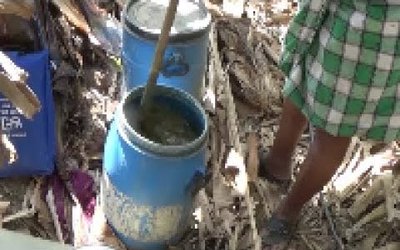
Preparation method of grass fertilizer: –

1. Fill the fresh grass pieces completely by 2/3 part of the 5 gallon bucket.

2. Fill the water up to a few inches below the top.

3. Leave it for 3 days at room temperature, and mix this mixture once a day.

4. Filter the liquid mixture.

5. Dilute “tea” with water of equal parts.

6. Using foliar-spray, fertilize the fertilizer on the soil and leaves.

Benefit:

It offers free food to the garden. At the same time, the most important thing is that you should put it in your garden regularly, because there is a beneficial nutrient (nitrogen and potassium) present in the piece of grass, although it is available only in small quantities .

Caution:

Do not use herbicide grass.

Poonam Singh

Jeevamrutham-Elixir and the Sea of Micro Organisms for Soil

Jeevamrutham-Elixir and the Sea of Micro Organisms for Soil

There is an ocean of micro-organisms, which increases the humidity and activities of living organisms living in the soil when irrigated in the field. When Jeevamrutam is used as a foliar spray, it plays an important role in promoting growth and providing immunity to plants.

Materials Required for Jeevamrutham:

  • Water
  • Cow urine (25 ml to 50 ml per litre of water)
  • Cow dung (50 gm per litre of water)
  • Jaggery (5 grams per litre of water) or sugarcane juice (20 ml to 40 ml per litre of water) or sugarcane pieces (50 grams per litre of water) or pulses of any sweet fruit (5 grams per litre of water) like: – ripe chikoo, papaya, banana etc.
  • Pulses of gram flour etc.: – Chavadi, Arhar, Chana or Urad (5 gram per litre of water) is used. Green pea flour, soybean and peanuts should not be used as they are available in high percentage of the amount of oil.
  • Ensure a lot of soil from farm dykes, clay bundles, which do not have any stone.

Preparation method:

Step 1:

Mix all the ingredients in a plastic or cement tank. Make sure there is no lump in cow’s dung or gram flour. Use a wooden stick for the mixture. The wooden stick should rotate in the direction of the clock wise in the mixture, so that positive energy spreads in the mixture.

Step 2:

Cover the tank with a jute sack or poly net. The tank should be in shadow and it should be remembered that the tank is not directly exposed to sunlight or rain water.

Step 3:

Use a wooden stick in both morning and evening for days, mix the Jeevamrutham mixture for 1 minute.

Step 4:

1. Prepare for live use after 48 to 72 hours.

2. Filter the liquid mixture and place the filtered liquid mixture in a glass or plastic bottle or tank.

Step 5:

1. After filtering the liquid mixture, add water in the same amount again in the sludge remaining in the tank.

2. Leave this mixture again for 48 hours.

3. After the completion of the time, the second batch of the Jeevamrutham will be ready.

Step 6:

After the second batch is ready, use it for spraying in the field.

Preparation time:

48 to 72 hours

Storage:

1. 8 to 15 days within 8 days of preparation should be used.

2. After 7 days, due to many microorganisms present in the liquid mixture, smell comes from the Jeevamrutham.

3. Jeevamrutham should not be used after 15 days.

 Use:

1. Jeevamrutham is used by mixing water with irrigation water in the field or by mixing it with your hands in the soil or by spraying it by the foliar-spray or by putting it on the ground directly during rainy season.

2. To use irrigation water mixed with water or sprinkling on the soil, 200 liters of Jeevamrutham should be used for 1 acre farm per month.

Poonam Singh

Brahmastra – Against missile-sucking insects

Brahmastra – Against missile-sucking insects

Brahmastra is a very powerful missile against large insects such as borer, fruit borer and pod borer.

This liquid mixture can be made by farmers easily at home.

Materials Required for Brahmastra:

1. Cow urine

2. Neem leaves are crushed (with a thin stem) or neem seeds powder 100 grams per acre of cow urine

3. Karanj leaves crushed 100 grams of cow urine per liter

4. Custard apple leaves crushed 100 grams per liter cow urine

5. Castor leaves crushed 100 grams of cow urine per liter

6. Dhatura leaves crushed 100 grams per liter cow urine

Preparation method:

Step 1:

Mix all the ingredients in a pottery vessel. Use a wooden stick to mix the ingredients mixture. Wooden stick rotating in the mixture according to the clock wise, so that positive energy spreads in the mixture.

Step 2:

Boil the mixture on the fire and boil it.

Step 3:

Cover the tank with a jute sack or poly net. The tank should be in shadow and it should be noted that the tank is not directly exposed to sunlight or rain water. Leave the mixture for fermentation for 48 hours.

Step 4:

Twice in a day for 1 minute, keep the mixture rotating according to the clock wise by a wooden stick.

Step 5:

Filter the Brahmastra after 48 hours, and keep the mixture in the bottle and keep it safe.

Preparation time:

48 hours

Storage :

6 months.

Use:

Sprinkle the mixture on infected plants or mix 3% Brahmastra with water and sprinkle it with a foliar -spray. If the nuisance is high, then you can use a mixture of 4%. For 1 acre farm, mix 6 to 8 litres of Brahmastra mixture with 200 litres of water and sprinkle on the plants.

Pay attention:

1. Using sil-over, crush the neem leaves and other plants leaves. 2. Use only cow urine of indigenous cows.

Poonam Singh

Beejamrutha- Increasing immunity and germination in seeds

Beejamrutha- Increasing immunity and germination in seeds

Beejamrutha is used for seed treatment. Seed treatment is very important, because during the germination many diseases make up their footprints. The seeds treated with Beejamrut are more resistant to the seeds, which increase their chances of germination.


Materials Required for Beejamrutha:

  • Water (20 litre for 100 kg seed)
  • Cow urine (250 ml for each litre of water)
  • Cow dung (250 grams for each litre of water)
  • Lime (2.5 g per litre of water)
  • Ensure a lot of soil from dykes, clay bundles, which do not have any stone

Preparation method :

Step 1:

Mix all the ingredients in a plastic or cement tank. Make sure there is no lump in cow’s dung. Use a wooden stick for the mixture. The rod should be rotated according to the clock direction in the mixture so that positive energy spreads in the mixture.

Step 2:

Cover the tank with a jute sack or poly net. As soon as the tank is in the shadow, it should be ensured that the tank is not directly exposed to sunlight or rain water.

Step 3:

The next morning the Beejamrut is ready, and can be used for seed treatment.

Preparation time:

12-24 hours

Storage:

Use it to disinfect the seeds within 48 hours. However it can be kept for 7 days.

Use:

1. For the 100 kg seed, use 20 litres of water to prepare the seed production.

2. Spread the seeds on the plastic on the ground. Sprinkle Beejamrut on those seeds. Mix the seeds properly and make sure that all seeds are covered with Beejamrut.

3. seeds like pulses (Arhar, Ush, Libiya etc.) should be take care of. Because they are very delicate, therefore they should not rub them. Use your hands properly to mix seeds.

Do not use this treatment for soybean and peanut seeds because they have very thin layers on their seeds, due to wetting the layer of seeds can be damaged. Sow these seeds in 10 percent Ghan Jeevamrut.

After seeding treatment, let the seeds dry and then sow them.

While transplanting nursery plants, immerse the root in the Beejamrut mixture and then implant them in the fields.

Poonam Singh


Neemastra-(Insecticide)-For Mealybugs & Sucking Pests

Neemastra-(Insecticide)-For Mealybugs & Sucking Pests

Neemastra is a very good mixture to fight the dangers of nymph-sucking insects and mealybugs.

This mixture can be prepared by farmers easily at home.

Materials Required for Neemastra:

1. Water 200 litres for one acre of land.

2. In cow-urine 50 ml per litre of water.

3. In cow’s dung 10 grams per litre of water.

4. In crushed neem leaves (with thin stems) or neem seeds powder 50 gm per litre of water.

Preparation method of Neemastra:

Step 1:

Mix all the ingredients in a plastic or cement tank. Make sure there is no lump in cow’s dung. Use a wooden stick to mix the ingredients mixture. The wooden stick should be rotated in the mixture according to clockwise direction, so that positive energy spreads in the mixture.

Step 2:

Cover the tank with a jute sack or poly net. The tank should be in shadow and the tank should not be directly exposed to sunlight or rain water. Leave the mixture for 48 hours for fermentation.

Step 3:

Using a wooden stick for at least 1 minute, mix the mixture in clockwise direction in the morning and evening everyday.

Step 4:

Filter the mixture and use after 48 hours

Preparation time:

24 hours

Storage:

6 months

Use:

The mixture should be sprayed on plants. Do not mix the water in the mixture, sprinkle the same mixture.

Pay attention:

1. Crush neem leaves and stems using sil-over.

2. Only use cow urine and cow dung of indigenous cow.

Pooonam Singh


Natural Fungicide-Use-on crops and plants

Natural Fungicide-Use-on crops and plants

Farmers can also create natural fungicide, which help protect plants against attack by fungi.

These fungicide can be easily prepared by the farmer at home. Everything is naturally available to prepare it, and it costs very low to make it. Natural fungicide can be avoided by spreading the following diseases such as: – Powdery Mildew, Downey Mildew, Rust etc.

Method of making natural fungicide: –

Mixture 1:

1. For 1 acre, add 10 to 20 liters of Jeevamrut mixed in 200 liters of water and sprinkle it using a foliar-spray.

2. Before mixing with water, using the cloth, the Jeevamrut should be filtered.

Mixture 2: 

For 1 acre, mix 5 liter citrus buttermilk with 200 liters of water and sprinkle it on plants using foliar-spray.

Mixture 3: 

1. 5 kg of farm yard manure.

2. Make a good powder of compost and bind the powder in the fabric.

3. Leave the bundle of this powder in 200 liters of water for 48 hours.

4. After 48 hours, remove the bundle from the water and squeeze.

5. Dip the bundle again in water and take it out after a while and squeeze it again.

6. Repeat this procedure 3 times and then filter this mixture.

7. Spread the filtered mixture in 1 acre.

Mixture 4:

1. Take 2 liters of water in a vessel. Mix 200 grams (dry ginger) powder or Waving powder in it and mix this mixture well.

2. Cover the utensil and boil it on the fire. Boil this mixture over low flame until the water is half, then leave the mixture to cool down.

3. Take 2 liters of indigenous cow milk in a separate vessel and boil it on low flame.

4. When the milk starts to 1 boil, leave the milk to cool down. When milk is cooled, remove the cream above it.

5. Take 200 liters of water in a new tank and mix the prepared mixture and milk.

6. Mix this mixture thoroughly and then filter it using a cloth.

7. Spray this filtered mixture using the foliar-spray within 24 hours.

8. You can also use this mixture for 1 acre of land.

Poonam Singh


Pesticides

Pesticides

Pesticides is a substance that interrupts or kills organisms. Which we present as pests, harmful insects, or micro bacteria, which cause disease. Natural insecticides are such insecticides, which are usually made by other organisms to protect themselves, which are obtained from natural sources such as minerals or plants.


Most people believe that natural insecticides are always safer and more ecologically friendly than human-made pesticides, and this is mostly true, but this is not always the case. For example, nicotine is a natural insecticide found in tobacco leaves, and cigarette smoke contains highly addictive components. But in reality, most modern synthetic pesticides are more poisonous than them. If you claim that “natural = secure” then there is little doubt, because some natural insecticides are highly toxic.

Actually natural pesticides are more secure and more environmentally friendly than conventional pesticides. Since they are also very effective natural insecticides, most home and garden pests should be your first choice for control.

Pesticides come in various forms. While most people connect the term insecticide to those chemicals, which are sprinkled or dusted on food crops.

There are many types of pesticides available. 

1. Fungicide – Designed to eliminate or control the fungus. Plants can also be made to present specific forms of harmful fungus.

2. Herbicide- Designed to eliminate or reduce the presence of aggressive plant species and weeds.

3.  Pesticides – Focus on pressing, hitting, fooling, eating one or more types of insects or stopping nuisance.

4. Bactericidal- Designed to prevent the spread of one or more types of bacteria.

5. Bats- This product is designed to catch or kill large insects which are found in rabbits and dogs.

6. Repellents- Instead of eliminating or subtracting their number, insects have been created to reverse.

7. Rodentides- The chemical is used to control the rodent.

8. Luures- To make the chemists attractive for pests or to entice them with the ultimate intention to kill pesticides.

Benefits of natural pesticides:

1. Eco-friendly, safe for user / applicant and very effective when used correctly.

Disadvantages of natural pesticides:

1. Small residual activity (some users consider it a benefit) can be more expensive than traditional conventional pesticides.

2. To a lesser extent it can be insect-specific. Especially when compared to new synthetic pesticides.

Poonam Singh


Dashparni Ark-For Fungus and Bacterial Disease

Dashparni Ark-For Fungus and Bacterial Disease

The greenness of leaves, the health of plants, the majority of diseases and pests can be managed by the Dashparni Ark. Along with this there is a reduction in the cost of improving the quality of the fruit and the cost of plant protection measures. Plants are protected against fungal and bacterial diseases like: – powdery mildew, Rust, Smut, Downy mildew etc. This mixture can be made easily by the farmers at home.

Materials for Dashparni Ark:

1. Gilloy, Ghanari, Dhatura, Neem, Kaner, Sitafal, Mahananda, Arand, Papaya leaves  2 kg

2. Cow dung 5 kg

3. Cow urine 5 liters

4. Water 100 liters

Preparation method: 

Phase 1:

Take leaves of the above plants 2 kg each in a tank and crush the leaves well. Mix 5 liters of cow urine in crushed leaves and then add 100 liters of water and 5 kg cow dung to this mixture. 

Phase 2:

Cover the above material with a jute sack or poly net for 21 days for the storage of fermentation and leave the tank.

Phase 3:

Filter the ingredients done after 21 days and use it.

Preparation time: 

21 days

Storage:

6 months

Use: 

1. Use this mixed mixture with 5 ml / liters of water for better results.

2. Sprinkle on plants at intervals of 10 days.

Poonam Singh 

Baking Soda – In the form of natural fungicide and pesticide

Baking Soda – In the form of natural fungicide and pesticide

Baking soda or sodium bicarbonate, as you know, is a household product used in households, which is a cheap and effective way to protect your plants against diseases caused by fungi and cabbage worms.

Some people know how useful this simple kitchen product is for garden and gardens.

Baking soda as a fungicide

Baking soda: Some plants like: – Powdery Mildew on cucumbers, eggplants, tomatoes and strawberries is very effective for controlling fungi.


Necessary Ingredients: –

1. 3 spoons of baking soda

2. gallon of hot water

3. Liquid Washing Powder One Tablespoon

4. teaspoon vegetable oil


Preparation method

1. Mix 3 spoons baking soda in the hot water gallon, and this mixture will get rid of Powdery Mildew once the mixture is applied to the plants once a week.

2. Mixing a teaspoon of liquid washing powder and vegetable oil in the mixture gives you a very good natural fungicide, which is not only for soft vegetables like: – cucumber and melon, but rust and black Spot in the rose plants is also very effective for diseases such as spots.


Baking soda as pesticide

Another use of baking soda is for cabbage in your garden. When cabbage is attacked by caterpillars. So to get rid  of them, prepare a batch of dust that kills the insects.

Necessary Ingredients:-

1. 50 gms of baking soda

2. 50g flour

3. Container

Preparation method: –

1.Combine baking soda and flour with a quantity of 50/50 in a container and prepare the mixture.

2. Sprinkle this mixture on cabbage.


Use: –

When these insects kill the mixture, it sprayed on the plants. So this mixture can only be shown on its magic plants for a few days. Therefore, this process should be repeated several times a week. From which cabbage gets rid of small caterpillars.

Reason: –

The work of baking soda is that they make the leaves alkaline. That is to establish a vague environment for fungal spores.

Also, make sure that if you spray natural fungicide throughout the day on plants. So somewhere leaves will not end by burning. If you make a natural fungicide mixture very rigid, then with the burning of leaves the plants can too die. Along with this, if natural fungicides mix very weak nature, then this Powder does not prove to be effective against fungi.

Poonam Singh

Amrutpani/Amrut Pani-Elixir for dead soil

Amrutpani/Amrut Pani-Elixir for dead soil

The nectar is a late drink, which refreshes the deities, and has the power to revive the dead. Similarly, the Amrutpani activates the living soil, and turns the dead soil into living soil. This is a liquid manure. Like Panchagavya, the use of Amrutpani is also used to improve soil fertility.

Fresh cow’s dung contains nutrients not only for plants but also in the amount of millions of soil-friendly micro-organisms. When dung is fed well to micro-organisms, then they multiply, and when you feed these microorganisms to the soil, the soil is alive. Not only do they improve soil structure, but they begin to break the nutrients available in the soil in a form that can be easily taken by plants. The process of making Amrutapani is basically the process of increasing the number of life’s already available microbials in the fresh cow dung of Indian breed.

Materials Required for Amrutpani:

1. The fresh cow dung of Indian breed – 1 kg.

2. Cow urine of Indian breed – 1 liter.

3. Jiggery – 50 grams (sugarcane juice can be replaced with 2 glasses or raped six bananas)

4. Water – 10 liters.

Preparation method:

Phase 1:

1. Take a container of plastic or wood, add water and jaggery to it and mix it well.

2. Mix fresh cow dung and cow urine in the mixture, stirring the mixture with a wooden stick.


Phase 2:

Mix the water again in the mixture and stir it slowly in the same direction and bind the container’s face to the clothes.

Phase 3:

Amrutpani is ready for use in 4 days, mixed with wooden sticks 3 times a day.

Preparation time:

4 days.

Use:

1. Mix one liter of nectar-water with 10 liters of water and use it.

2. Use Amritpani to irrigate it every week.

3. The root treatment should be done 30 minutes before planting.


4. Dried leaves or dried sugarcane leaves are soaked in Amrutpani and used as mulch.

5. By giving water to plants using Amrutpani on a weekly basis, Amrutpani keeps the soil alive and enriches nutrients.

6. If the sprouting of nectar-water once in a week or 14 days, the infection of pests on plants can be reduced, as well as better use by the foiler-spray.

7. Before planting soak the seeds in nectar-water for 24 hours, after which use of seed yields better germination rate and stronger plants.

Follow by Email
LinkedIn
Share